Overview
In this tutorial, you add push notifications to the project so that a push notification is sent to the device every time a record is inserted.
If you do not use the downloaded quick start server project, you will need the push notification extension package. See for more information.
Prerequisites
This tutorial covers an Apache Cordova application developed with Visual Studio 2015 that runs on the Google Android Emulator, an Android device, a Windows device, and an iOS device.
To complete this tutorial, you need:
- A PC with or later versions.
- .
- An .
- A completed project.
- (Android) A with a verified email address.
- (iOS) An Apple Developer Program membership and an iOS device (iOS Simulator does not support push).
- (Windows) A Windows Store Developer Account and a Windows 10 device.
Configure a notification hub
App Service Mobile Apps uses to send pushes, so you will be configuring a notification hub for your mobile app.
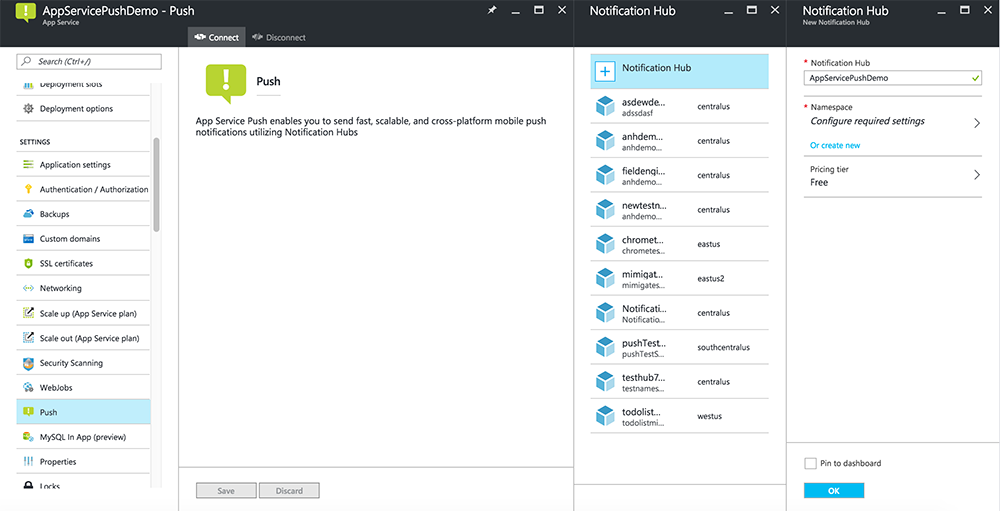
- In , go to App Services, then click your app backend. Under Settings, click Push.
- Click Connect to add a notification hub resource to the app. You can either create a hub or connect to an existing one.

Now you have connected a notification hub to your Mobile App backend. Later you will configure this notification hub to connect to a platform notification system (PNS) to push to devices.
Update the server project to send push notifications
In this section, you update code in your existing Mobile Apps backend project to send a push notification every time a new item is added. This is powered by Notification Hubs' feature, enabling cross-platform pushes. The various clients are registered for push notifications using templates, and a single universal push can get to all client platforms.
Choose the procedure below that matches your backend project type—either or .
.NET backend project
- In Visual Studio, right-click the server project and click Manage NuGet Packages, search for
Microsoft.Azure.NotificationHubs, then click Install. This installs the Notification Hubs library for sending notifications from your backend. - In the server project, open Controllers > TodoItemController.cs, and add the following using statements:Copy
using System.Collections.Generic; using Microsoft.Azure.NotificationHubs; using Microsoft.Azure.Mobile.Server.Config; - In the PostTodoItem method, add the following code after the call to InsertAsync:Copy
 // Get the settings for the server project.
 HttpConfiguration config = this.Configuration;
 MobileAppSettingsDictionary settings =
     this.Configuration.GetMobileAppSettingsProvider().GetMobileAppSettings();

 // Get the Notification Hubs credentials for the Mobile App.
 string notificationHubName = settings.NotificationHubName;
 string notificationHubConnection = settings
     .Connections[MobileAppSettingsKeys.NotificationHubConnectionString].ConnectionString;

 // Create a new Notification Hub client.
 NotificationHubClient hub = NotificationHubClient
 .CreateClientFromConnectionString(notificationHubConnection, notificationHubName);

 // Sending the message so that all template registrations that contain "messageParam"
 // will receive the notifications. This includes APNS, GCM, WNS, and MPNS template registrations.
 Dictionary<string,string> templateParams = new Dictionary<string,string>();
 templateParams["messageParam"] = item.Text + " was added to the list.";

 try
 {
     // Send the push notification and log the results.
     var result = await hub.SendTemplateNotificationAsync(templateParams);

     // Write the success result to the logs.
     config.Services.GetTraceWriter().Info(result.State.ToString());
 }
 catch (System.Exception ex)
 {
     // Write the failure result to the logs.
     config.Services.GetTraceWriter()
         .Error(ex.Message, null, "Push.SendAsync Error");
 }
This sends a template notification that contains the item.Text when a new item is inserted. - Republish the server project.
Node.js backend project
- If you haven't already done so, or else use the .
- Replace the existing code in todoitem.js with the following:Copy
 var azureMobileApps = require('azure-mobile-apps'),
 promises = require('azure-mobile-apps/src/utilities/promises'),
 logger = require('azure-mobile-apps/src/logger');

 var table = azureMobileApps.table();

 table.insert(function (context) {
 // For more information about the Notification Hubs JavaScript SDK,
 // see http://aka.ms/nodejshubs
 logger.info('Running TodoItem.insert');

 // Define the template payload.
 var payload = '{"messageParam": "' + context.item.text + '" }';

 // Execute the insert.  The insert returns the results as a Promise,
 // Do the push as a post-execute action within the promise flow.
 return context.execute()
     .then(function (results) {
         // Only do the push if configured
         if (context.push) {
             // Send a template notification.
             context.push.send(null, payload, function (error) {
                 if (error) {
                     logger.error('Error while sending push notification: ', error);
                 } else {
                     logger.info('Push notification sent successfully!');
                 }
             });
         }
         // Don't forget to return the results from the context.execute()
         return results;
     })
     .catch(function (error) {
         logger.error('Error while running context.execute: ', error);
     });
 });

 module.exports = table;
This sends a template notification that contains the item.text when a new item is inserted. - When editing the file on your local computer, republish the server project.
Modify your Cordova app to receive push notifications
You must make sure that your Apache Cordova app project is ready to handle push notifications by installing the Cordova push plugin plus any platform-specific push services.
Update the Cordova version in your project.
We recommended that you update the client project to Cordova 6.1.1 if your project is configured using an older version. To update the project, right-click config.xml to open the configuration designer. Select the Platforms tab and choose 6.1.1 in the Cordova CLI text box.
Choose Build, then Build Solution to update the project.
Install the push plugin
Apache Cordova applications do not natively handle device or network capabilities. These capabilities are provided by plugins that are published either on or on GitHub. The
phonegap-plugin-push plugin is used to handle network push notifications.
You can install the push plugin in one of these ways:
From the command-prompt:
Execute the following command:
Copy
cordova plugin add phonegap-plugin-push
From within Visual Studio:
- In Solution Explorer, open the
config.xmlfile click Plugins > Custom, select Git as the installation source, then enterhttps://github.com/phonegap/phonegap-plugin-pushas the source.
- Click on the arrow next to the installation source.
- In SENDER_ID, if you already have a numeric project ID for the Google Developer Console project, you can add it here. Otherwise, enter a placeholder value, like 777777, and if you are targeting Android you can update this value in config.xml later.
- Click Add.
The push plugin is now installed.
Install the device plugin
Follow the same procedure you used to install the push plugin, but you will find the Device plugin in the Core plugins list (click Plugins > Core to find it). You need this plugin to obtain the platform name (
device.platform).Register your device for push on start-up
Initially, we will include some minimal code for Android. Later, we will make some small modifications to run on iOS or Windows 10.
- Add a call to registerForPushNotifications during the callback for the login process, or at the bottom of the onDeviceReady method:Copy
 // Login to the service.
 client.login('google')
     .then(function () {
         // Create a table reference
         todoItemTable = client.getTable('todoitem');

         // Refresh the todoItems
         refreshDisplay();

         // Wire up the UI Event Handler for the Add Item
         $('#add-item').submit(addItemHandler);
         $('#refresh').on('click', refreshDisplay);

             // Added to register for push notifications.
         registerForPushNotifications();

     }, handleError);
This example shows calling registerForPushNotifications after authentication succeeds, which is recommended when using both push notifications and authentication in your app. - Add the new registerForPushNotifications method as follows:Copy
// Register for Push Notifications. Requires that phonegap-plugin-push be installed. var pushRegistration = null; function registerForPushNotifications() { pushRegistration = PushNotification.init({ android: { senderID: 'Your_Project_ID' }, ios: { alert: 'true', badge: 'true', sound: 'true' }, wns: {} }); // Handle the registration event. pushRegistration.on('registration', function (data) { // Get the native platform of the device. var platform = device.platform; // Get the handle returned during registration. var handle = data.registrationId; // Set the device-specific message template. if (platform == 'android' || platform == 'Android') { // Register for GCM notifications. client.push.register('gcm', handle, { mytemplate: { body: { data: { message: "{$(messageParam)}" } } } }); } else if (device.platform === 'iOS') { // Register for notifications. client.push.register('apns', handle, { mytemplate: { body: { aps: { alert: "{$(messageParam)}" } } } }); } else if (device.platform === 'windows') { // Register for WNS notifications. client.push.register('wns', handle, { myTemplate: { body: '<toast><visual><binding template="ToastText01"><text id="1">$(messageParam)</text></binding></visual></toast>', headers: { 'X-WNS-Type': 'wns/toast' } } }); } }); pushRegistration.on('notification', function (data, d2) { alert('Push Received: ' + data.message); }); pushRegistration.on('error', handleError); } - (Android) In the above code, replace
Your_Project_IDwith the numeric project ID for your app from the .
(Optional) Configure and run the app on Android
Complete this section to enable push notifications for Android.
Enable Firebase Cloud Messaging
Since we are targeting the Google Android platform initially, you must enable Firebase Cloud Messaging. Similarly, if you were targeting Microsoft Windows devices, you would enable WNS support.
- Log in to the . Create a new Firebase project if you don't already have one.
- After your project is created click Add Firebase to your Android app and follow the instructions provided.

- In the Firebase Console, click the cog for your project and then click Project Settings.

- Click the Cloud Messaging tab in your project settings and copy the value of the Server key and Sender ID. These values will be used later to configure the notification hub Access Policy and your notification handler in the app.
Configure the Mobile App backend to send push requests using FCM
- In the , click Browse All > App Services > your Mobile App backend. Under Settings, click on App Service Push, then click your notification hub name.
- Go to Google (GCM), enter the FCM server key you obtained from the Firebase console, then click Save.
Your service is now configured to work with Firebase Cloud Messaging!
Configure your Cordova app for Android
In your Cordova app, open config.xml and replace
Your_Project_ID with the numeric project ID for your app from the .
Copy
    <plugin name="phonegap-plugin-push" version="1.7.1" src="https://github.com/phonegap/phonegap-plugin-push.git">
        <variable name="SENDER_ID" value="Your_Project_ID" />
    </plugin>
Open index.js and update the code to use your numeric project ID.
Copy
    pushRegistration = PushNotification.init({
        android: { senderID: 'Your_Project_ID' },
        ios: { alert: 'true', badge: 'true', sound: 'true' },
        wns: {}
    });
Configure your Android device for USB debugging
Before you can deploy your application to your Android Device, you need to enable USB Debugging. Perform the following steps on your Android phone:
- Go to Settings > About phone, then tap the Build number until developer mode is enabled (about 7 times).
- Back in Settings > Developer Options enable USB debugging, then connect your Android phone to your development PC with a USB Cable.
We tested this using a Google Nexus 5X device running Android 6.0 (Marshmallow). However, the techniques are common across any modern Android release.
Install Google Play Services
The push plugin relies on Android Google Play Services for push notifications.
- In Visual Studio, click Tools > Android > Android SDK Manager, expand the Extras folder and check the box to make sure that each of the following SDKs is installed.
- Android 2.3 or higher
- Google Repository revision 27 or higher
- Google Play Services 9.0.2 or higher
- Click on Install Packages and wait for the installation to complete.
The current required libraries are listed in the .
Test push notifications in the app on Android
You can now test push notifications by running the app and inserting items in the TodoItem table. You can do this from the same device or from a second device, as long as you are using the same backend. Test your Cordova app on the Android platform in one of the following ways:
- On a physical device:
Attach your Android device to your development computer with a USB cable. Instead of Google Android Emulator, select Device. Visual Studio will deploy the application to the device and run it. You can then interact with the application on the device.
Improve your development experience. Screen sharing applications such as can assist you in developing an Android application by projecting your Android screen on to a web browser on your PC. - On an Android emulator:
There are additional configuration steps required when running on an emulator.Make sure that you are deploying to or debugging on a virtual device that has Google APIs set as the target, as shown below in the Android Virtual Device (AVD) manager. If you want to use a faster x86 emulator, you and configure the emulator use it.Add a Google account to the Android device by clicking Apps > Settings > Add account, then follow the prompts to add an existing Google account to the device (we recommend using an existing account rather than creating a new one).
 Run the todolist app as before and insert a new todo item. This time, a notification icon is displayed in the notification area. You can open the notification drawer to view the full text of the notification.
(Optional) Configure and run on iOS
This section is for running the Cordova project on iOS devices. You can skip this section if you are not working with iOS devices.
Install and run the iOS remotebuild agent on a Mac or cloud service
Before you can run a Cordova app on iOS using Visual Studio, go through the steps in the to install and run the remotebuild agent.
Make sure you can build the app for iOS. The steps in the setup guide are required to build for iOS from Visual Studio. If you do not have a Mac, you can build for iOS using the remotebuild agent on a service like MacInCloud. For more info, see .
Note
XCode 7 or greater is required to use the push plugin on iOS.
Find the ID to use as your App ID
Before you register your app for push notifications, open config.xml in your Cordova app, find the
id attribute value in the widget element, and copy it for later use. In the following XML, the ID is io.cordova.myapp7777777.
Copy
    <widget defaultlocale="en-US" id="io.cordova.myapp7777777"
      version="1.0.0" windows-packageVersion="1.1.0.0" xmlns="http://www.w3.org/ns/widgets"
        xmlns:cdv="http://cordova.apache.org/ns/1.0" xmlns:vs="http://schemas.microsoft.com/appx/2014/htmlapps">
Later, use this identifier when you create an App ID on Apple's developer portal. (If you create a different App ID on the developer portal and want to use that, you will need to take a few extra steps later in this tutorial to change this ID in config.xml. The ID in the widget element must match the App ID on the developer portal.)
Register the app for push notifications on Apple's developer portal
- . Create an explicit App ID (not a wildcard App ID) and, for Bundle ID, use the exact Bundle ID that is in your Xcode quickstart project. It is also crucial that you check the Push Notifications option.
- Next, , create either a "Development" or "Distribution" SSL certificate.
Configure Azure to send push notifications
- On your Mac, launch Keychain Access. Open My Certificates under Category on the left navigationn bar. Find the SSL certificate you downloaded in the previous section and disclose its contents. Select only the certificate (do not select the private key), and .
- In the , click Browse All > App Services > your Mobile App backend. Under Settings, click on App Service Push, then click your notification hub name. Go to Apple Push Notification Services > Upload Certificate. Upload the .p12 file, selecting the correct Mode (depending on whether your client SSL certificate from earlier is Production or Sandbox). Save any changes.
Your service is now configured to work with push notifications on iOS!
Verify that your App ID matches your Cordova app
If the App ID you created in your Apple Developer Account already matches the ID of the widget element in config.xml, you can skip this step. However, if the IDs don't match, take the following steps:
- Delete the platforms folder from your project.
- Delete the plugins folder from your project.
- Delete the node_modules folder from your project.
- Update the id attribute of the widget element in config.xml to use the App ID that you created in your Apple Developer Account.
- Rebuild your project.
Test push notifications in your iOS app
- In Visual Studio, make sure that iOS is selected as the deployment target, and then choose Device to run on your connected iOS device.You can run on an iOS device connected to your PC using iTunes. The iOS Simulator does not support push notifications.
- Press the Run button or F5 in Visual Studio to build the project and start the app in an iOS device, then click OKto accept push notifications.
Note
You must explicitly accept push notifications from your app. This request only occurs the first time that the app runs. - In the app, type a task, and then click the plus (+) icon.
- Verify that a notification is received, then click OK to dismiss the notification.
(Optional) Configure and run on Windows
This section is for running the Apache Cordova app project on Windows 10 devices (the PhoneGap push plugin is supported on Windows 10). You can skip this section if you are not working with Windows devices.
Register your Windows app for push notifications with WNS
To use the Store options in Visual Studio, select a Windows target from the Solution Platforms list, like Windows-x64or Windows-x86 (avoid Windows-AnyCPU for push notifications).
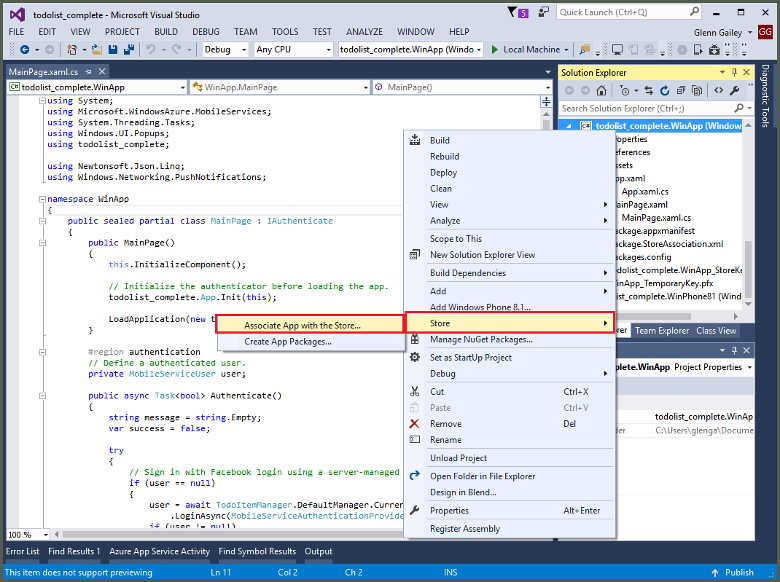
- In Visual Studio Solution Explorer, right-click the Windows Store app project, click Store > Associate App with the Store....

- In the wizard, click Next, sign in with your Microsoft account, type a name for your app in Reserve a new app name, then click Reserve.
- After the app registration is successfully created, select the new app name, click Next, and then click Associate. This adds the required Windows Store registration information to the application manifest.
- Repeat steps 1 and 3 for the Windows Phone Store app project using the same registration you previously created for the Windows Store app.
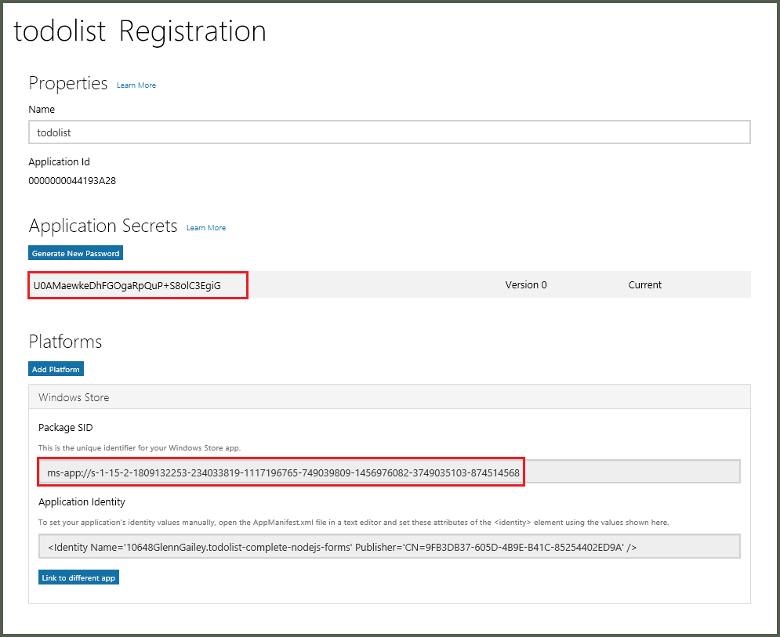
- Navigate to the , sign-in with your Microsoft account, click the new app registration in My apps, then expand Services > Push notifications.
- In the Push notifications page, click Live Services site under Windows Push Notification Services (WNS) and Microsoft Azure Mobile Apps, and make a note of the values of the Package SID and the current value in Application Secret.

Important
The application secret and package SID are important security credentials. Do not share these values with anyone or distribute them with your app.
Configure the notification hub for WNS
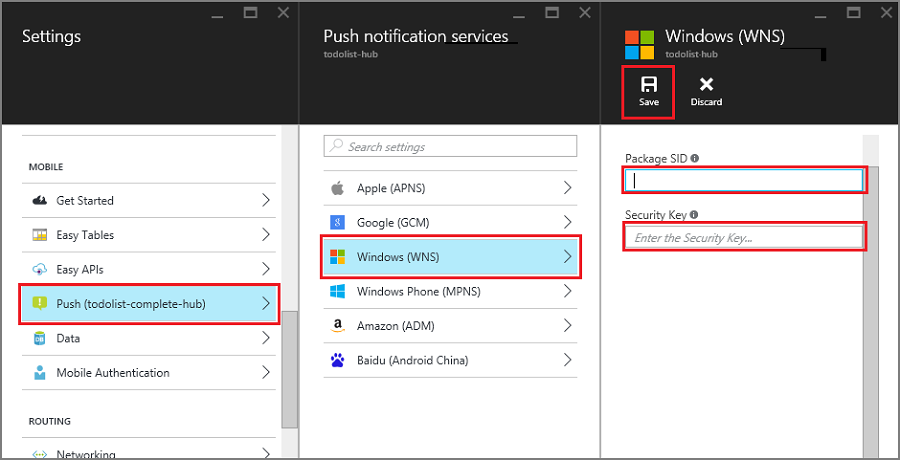
- In the , click Browse All > App Services > your Mobile App backend. Under Settings, click on App Service Push, then click your notification hub name.
- Go to Windows (WNS), enter the Security key (client secret) and Package SID that you obtained from the Live Services site, then click Save.

Your backend is now configured to use WNS to send push notifications.
Configure your Cordova app to support Windows push notifications
Open the configuration designer (right-click on config.xml and select View Designer), select the Windows tab, and choose Windows 10 under Windows Target Version.
Note
If you are using a Cordova version prior to Cordova 5.1.1 (6.1.1 recommended), you must also set the Toast Capable flag to true in config.xml.
To support push notifications in your default (debug) builds, open build.json file. Copy the "release" configuration to your debug configuration.
Copy
    "windows": {
        "release": {
            "packageCertificateKeyFile": "res\\native\\windows\\CordovaApp.pfx",
            "publisherId": "CN=yourpublisherID"
        }
    }
After the update, the preceding code should look like this.
Copy
"windows": {
    "release": {
        "packageCertificateKeyFile": "res\\native\\windows\\CordovaApp.pfx",
        "publisherId": "CN=yourpublisherID"
        },
    "debug": {
        "packageCertificateKeyFile": "res\\native\\windows\\CordovaApp.pfx",
        "publisherId": "CN=yourpublisherID"
        }
    }
Build the app and verify that you have no errors. You client app should now register for the notifications from the Mobile App backend. Repeat this section for every Windows project in your solution.
Test push notifications in your Windows app
In Visual Studio, make sure that a Windows platform is selected as the deployment target, such as Windows-x64 or Windows-x86. To run the app on a Windows 10 PC hosting Visual Studio, choose Local Machine.
Press the Run button to build the project and start the app.
In the app, type a name for a new todoitem, and then click the plus (+) icon to add it.
Verify that a notification is received when the item is added.
Next Steps
- Read about to learn about push notifications.
- If you have not already done so, continue the tutorial by to your Apache Cordova app.
Learn how to use the SDKs.