Azure BLOB storage is persistent Cloud data storage that serves a variety of purposes. Mike Wood shows the basics of how to use it, from start through to snapshots and metadata; both from .NET, and by using the free tool, Cerebrata Azure Explorer.
Windows Azure BLOB storage service can be used to store and retrieve Binary Large Objects (BLOBs), or what are more commonly known as files. In this introduction to the Windows Azure BLOB Storage service we will cover the difference between the types of BLOBs you can store, how to get files into and out of the service, how you can add metadata to your files and more.
There are many reasons why you should consider using BLOB storage. Perhaps you want to share files with clients, or off-load some of the static content from your web servers to reduce the load on them. However, if you are using Azure’s Platform as a Service (PaaS), also known as Cloud Services, you’ll most likely be very interested in BLOB storage because it provides persistent data storage. With Cloud Services you get dedicated virtual machines to run your code on without having to worry about managing those virtual machines. Unlike the hard drives found in Windows Azure Virtual Machines (the Infrastructure as a Service -IaaS- offering from Microsoft), the hard drives used in Cloud Services instances are not persistent. Because of this, any files you want to have around long term should be put into a persistent store, and this is where BLOB storage is so useful.
Where Do We Start?
BLOB Storage, along with Windows Azure Tables and Windows Azure Queues make up the three Windows Azure Storage services. Azure tables are a non-relational, key-value-pair storage mechanism and the Queue service provides basic message-queuing capabilities. All three of these services store their data within a Windows Azure Storage Account which we will need to get started. At the time of writing, each account can hold up to 200 TB of data in any combination of Tables, Queues or BLOBs and all three can be accessed via public HTTP or HTTPS REST based endpoints, or through a variety of client libraries that wrap the REST interface.
To get started using the BLOB service, we’ll first need to have a Windows Azure account and create a Storage Account. You can get a free trial account or, if you have a MSDN Subscription, you can sign up for your Windows Azure benefits in order to try out the examples included in this article. After you have signed up for your Azure account, you can then create a storage account that can then be used to store BLOBs.
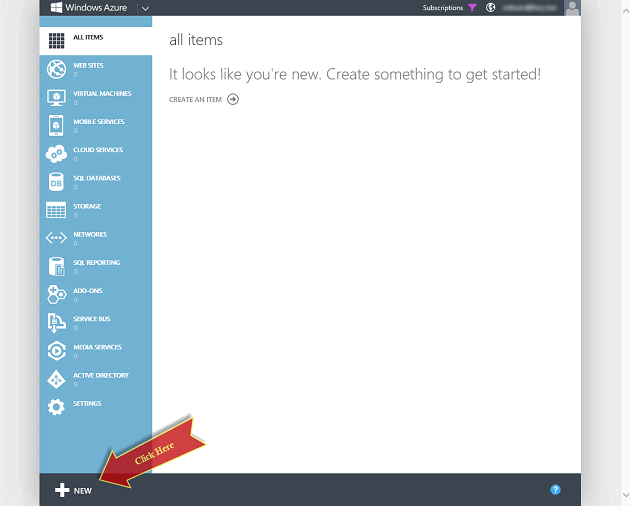
To create a storage account, log in to the Windows Azure management portal at https://manage.windowsazure.com. After you log in to the portal you can quickly create a Storage Account by clicking on the large NEW icon at the bottom left hand of the portal.
From the expanding menu select the ‘Data Services’ option, then ‘Storage’ and finally, ‘Quick Create’.
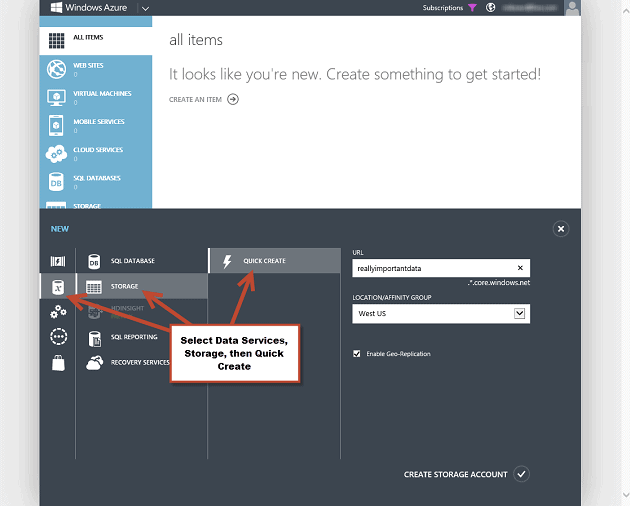
You will now need to provide a name for your storage account in the URL textbox. This name is used as part of the URL for the service endpoint and so it must be globally unique. The portal will indicate whether the name is available whenever you pause or finish typing. Next, you select a location for your storage account by selecting one of the data center locations in the dropdown. This location will be the primary storage location for your data, or more simply, your account will reside in this Data Center. If you have created ‘affinity groups’, which is a friendly name of a collection of services you want to run in the same location, you will also see that in your drop down list. If you have more than one Windows Azure subscriptions related to your login address, you may also see a dropdown list to enable you to select the Azure subscription that the account will belong to.
All storage accounts are stored in triplicate, with transactionally-consistent copies in the primary data center. In addition to that redundancy, you can also choose to have ‘Geo Replication’ enabled for the storage account. ‘Geo Replication’ means that the Windows Azure Table and BLOB data that you place into the account will not only be stored in the primary location but will also be replicated in triplicate to another data center within the same region. So, if you select ‘West US’ for your primary storage location, your account will also have a triplicate copy stored in the East US data center. This mapping is done automatically by Microsoft and you can’t control the location of your secondary replication, but it will never be outside of a region so you don’t have to worry about your West US based account somehow getting replicated to Europe or Asia as part of the Geo Replication feature. Storage accounts that have Geo Replication enabled are referred to as geo redundant storage (GRS) and cost slightly more than accounts that do not have it enabled, which are called locally redundant storage (LRS).
Once you have selected the location and provided a name, you can click the ‘Create Storage Account’ action at the bottom of the screen. The Windows Azure portal will then generate the storage account for you within a few moments. When the account is fully created, you will see a status of Online. By selecting the new storage account in the portal, you can retrieve one of the access keys we will need in order to work with the storage account.
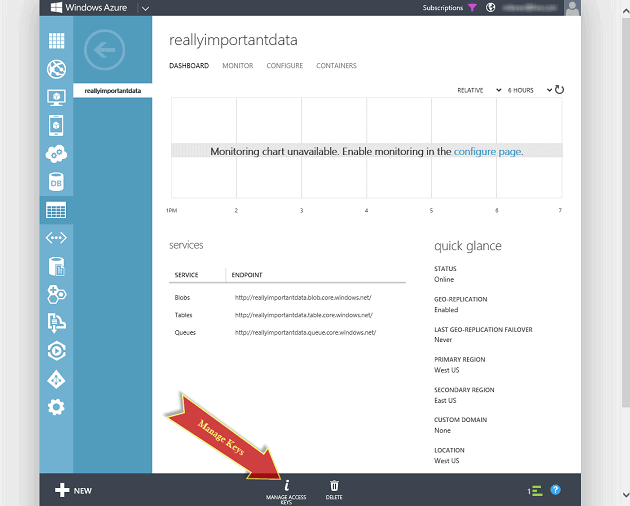
Click on the ‘Manage Access Keys’ at the bottom of the screen to display the storage account name, which you provided when you created the account, and two 512 bit storage access keys used to authenticate requests to the storage account. Whoever has these keys will have complete control over your storage account short of deleting the entire account. They would have the ability to upload BLOBs, modify table data and destroy queues. These account keys should be treated as a secret in the same way that you would guard passwords or a private encryption key. Both of these keys are active and will work to access your storage account. It is a good practice to use one of the keys for all the applications that utilize this storage account so that, if that key becomes compromised, you can use this dialog to regenerate the key you haven’t been using, then update the all the apps to use that newly regenerated key and finally regenerate the compromised key. This would prevent anyone abusing the account with the compromised key.
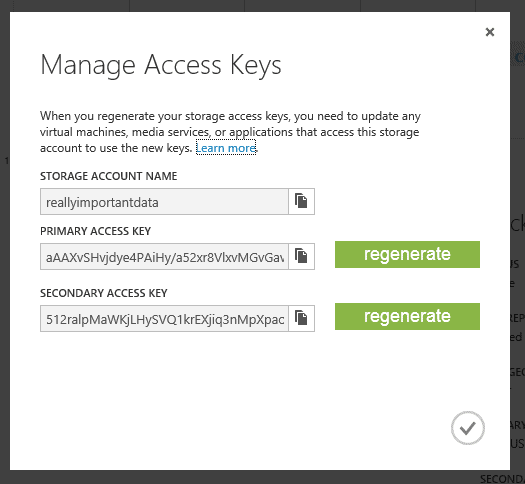
Your storage account is now created and we have what we need to work with it. For now, get a copy of the Primary Access Key by clicking on the copy icon next to the text box.
What Kind of BLOB is that?
Any file type can be stored in the Windows Azure BLOB Storage service, such as Image files, database files, text files, or virtual hard drive files. However, when they are uploaded to the service they are stored as either a Page BLOB or a Block BLOB depending on how you plan on using that file or the size of the file you need to work with.
Page BLOBs are optimized for random reads and writes so they are most commonly used when storing virtual hard drive files for virtual machines: In fact, the Page BLOB was introduced when the first virtual drive for Windows Azure was announced: the Windows Azure Cloud Drive (at the time they were known as Windows Azure X-Drives). Nowadays, the persisted disks used by Windows Azure Virtual Machine (Microsoft’s IaaS offering) also use the Page BLOB to store their data and Operating System drives. Each Page BLOB is made up of one or more 512-byte pages of data, up to a total size limit of 1 TB per file.
The majority of files that you upload would benefit from being stored as Block BLOBs, which are written to the storage account as a series of blocks and then committed into a single file. We can create a large file by breaking it into blocks, which can be uploaded concurrently and then then committed together into a single file in one operation. This provides us with faster upload times and better throughput. The client storage libraries manage this process by uploading files of less than 64 MB in size in a single operation, and uploading larger files across multiple operations by breaking down the files and running the concurrent uploads. A Block BLOB has a maximum size of 200 GB. For this article we will be using Block BLOBs in the examples.
Upload a File Already!
With a storage account created, and our access key available, we can utilize any of the three Windows Azure storage services including BLOB storage from outside of Windows Azure. Of course, you’ll want a way of viewing your BLOB storage in the same way you look at any other file system. We’ll show you how a bit later, but if you’re developing an application, your first concern will probably be to have the means to upload files automatically from code. We will therefore now look at the code that is required to upload a file, starting with a simple console application that uploads a file using the 2.0 Windows Azure .NET client library in C#.
Using Visual Studio create a new C# Console application.
When the standard console application is created from the template, it will not have a reference to the storage client library. We will add it using the Package Manager (NuGet).
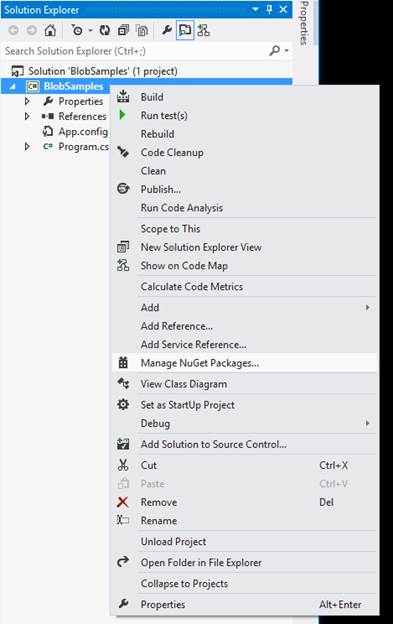
Right-click on the project, and select ‘Manage NuGet Packages’ from the context menu.
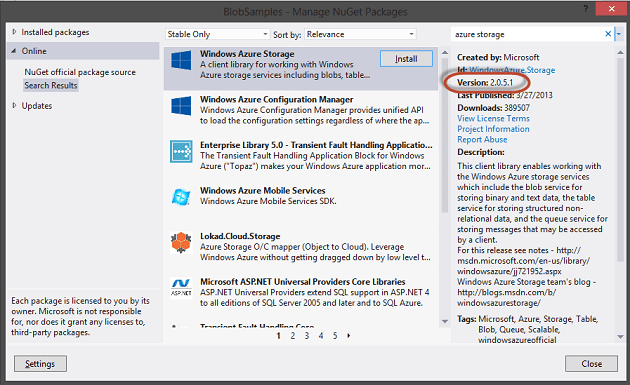
This will load up the Package Manager UI. Select the ‘Online‘ tab from the Package Manager dialog, and search for ‘Azure Storage’. As of the time of this writing version 2.0.5.1 was available. Select the Windows Azure Storage package and click ‘Install‘.
If you prefer to manage your packages via the Package Manager Console, you can also type
Install-Package WindowsAzure.Storage to achieve the same result. The Package Manager will add the references needed by the storage client library. Some of these references won’t be utilized when just working with BLOB storage. Below you can see that several assembly references were added, but specifically the Microsoft.WindowsAzure.Configuration and Microsoft.WindowsAzure.Storage assemblies are what we will be working with in this example.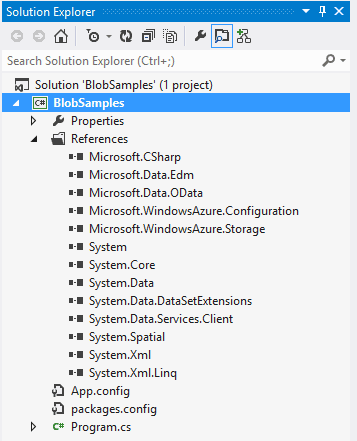
Open up the
program.cs file and add the following using statements:
Then add this code to the Main method:
Modify the code to add the storage account name for the
accountName variable and the storage account access key from when you created the account in the portal for the accountKey variable. Also, substitute the file name used with the OpenRead method with a file that you wish to upload. I’d suggest an image or something small for this example. For real applications, you will want to have the account name and key in a configuration file, or passed in so that you are not hard-coding these values.
The account name and key values are used to create a
StorageCredential instance, which is then used to create an instance of the CloudStorageAccount object. The CloudStorageAccountobject represents a storage account that you will be accessing. From this object you can obtain references to BLOBs, tables and queues within the storage account. Note that when we create the instance of the CloudStorageAccount, we specify ‘true’ for the useHttps constructor argument. This will cause all of our operation calls to our storage account to be encrypted with SSL. Because all wire-level communications are therefore encrypted, and all requests are signed using the credentials provided in the StorageCredential object, we can have some confidence that our operations are secure from prying eyes.
Since we are using BLOB storage, we then create an instance of a
CloudBlobClient object to provide the client interface that is needed to work with BLOBs. Using the CloudBlobClient object we then get a reference to a container. A container is much like a base directory off the root of a hard drive. In this case, the container we are getting a reference to is named “samples”. On the next line, we call CreateIfNotExists which will actually cause the client library to call out to the public REST endpoint in Windows Azure to check if the container exists and, if not, will create the container. This provides us a location to upload our file to.
The last portion of the code gets a reference to a block BLOB within the container we created. This file doesn’t exist yet, we are just creating a reference to it as a
CloudBlockBlob object. We will then use this to upload the file by providing a file stream of our file to the UploadFromStream method. The client library will then send up the file, creating the file in our Azure storage account. Note that many of the client library methods support the asynchronous programming pattern using Begin/End versions. For example, to asynchronously start an upload you can call BeginUploadFromStream.
The client library may make more than one call to the REST API to upload the file if it is fairly large. You can control the size of file that is sent up as a single operation by setting the
SingleBlobUploadThresholdInBytes property. This defaults to 32 MB and can be set as high at 64 MB. Anything over that 64 MB mark will be automatically broken into smaller blocks and uploaded. If a file does get broken down by the client library for upload, it will use a single thread by default to perform the upload. You can set the ParallelOperationThreadCount property to indicate how many threads you would like the client library to use to concurrently upload your file. Just be sure to be careful that if you are asynchronously uploading a lot of files and setting the ParallelOperationThreadCount option fairly high, you may see some ‘bottlenecking’ and slow throughput.Ahhh, Where Did the File Go?
When you run the code provided above, you really won’t see much happening. If the file uploaded with no errors then you’ll simply see “Done… press a key to end.” appear in your console. Did it work? Do you now have a file in your storage account? This is where it is handy to have a way of viewing, copying, and deleting files in BLOB storage just as you would in a file system, which is exactly what Azure Explorer from Cerebrata is made for.
Download and install Azure Explorer for free at http://www.cerebrata.com/labs/azure-explorer . This is a click-once deployed application, so you’ll be notified of updates to the application as they are released.
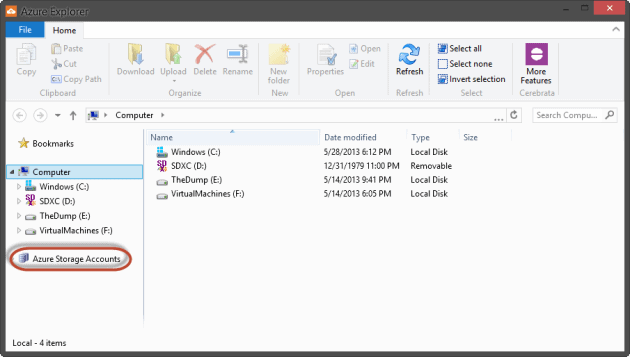
The interface for Azure Explorer looks a lot like Windows Explorer in Windows 8. You see the ribbon interface at the top and the local computer drives listed (C:, D:, etc.). You can use this tool to move files around your computer as well; however, the real power is under that Azure Storage Accounts node circled in red. Right-click on the ‘Azure Storage Accounts’ Node and select “Add Account“.
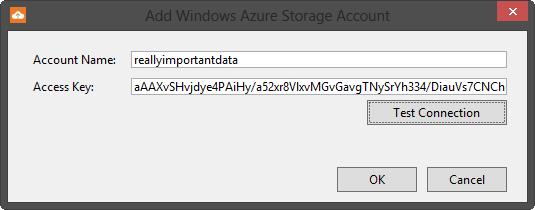
Add the storage account name and the access key to the dialog. These are the same values that you retrieved from the portal when you created the account, and the values you used for the
accountName and accountKey variables in your code. You can test that your values are correct using the ‘Test Connection’ button. Once you get a good connection, click ‘OK’. Some of you may be tempted to try using the access key you see above to mess with my storage account, but that won’t get you too far. The key is still larger than you see in the dialog and I’ve already regenerated the access keys.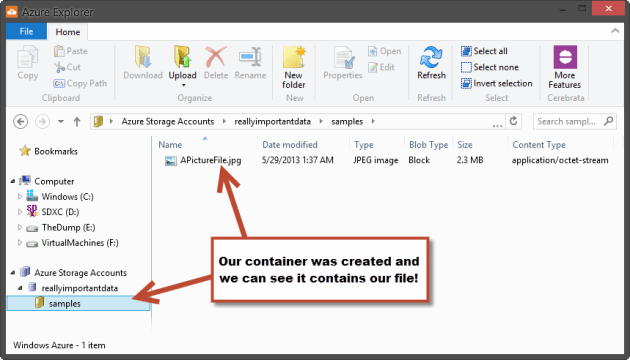
Now if you expand the Azure Storage Accounts node, you’ll see the account you just added. By then drilling into that tree view you’ll see the container that we created through our code, and the file that we uploaded. If you live in London, or any of the great cities that happen to fall into the UTC time zone, the modified date on the file will look correct; however, if you live in one of the other time zones than you’ll notice that it doesn’t quite match up with your date time. Windows Azure services store everything in UTC and will report all dates in that time zone as well. Please bear this in mind.
By using Azure Explorer, we can
- upload new files
- download files that are in our storage account
- delete files
- rename files
In fact, most of the operations you’d expect to be able to do to manage files on a file system are available for BLOB storage via Azure Explorer, including drag and drop. The file can even be opened by double-clicking on it, causing it to be downloaded to a temporary directory and opened with an application on your machine registered to work with the file type you selected.
Cool! How do I Share Files with Others?
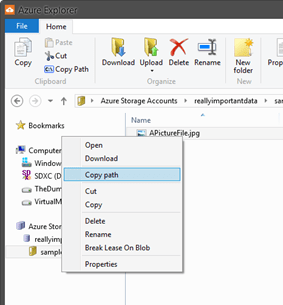
One of the benefits of using BLOB storage is so that the content can easily be shared with others. Every file that you place into BLOB storage can actually be reached via a URL. If you right-click on the file in Azure Explorer, you can select ‘Copy Path’.
This will copy the URL of the file onto your clipboard. The URL will look something like this:
https://reallyimportantdata.blob.core.windows.net/samples/APictureFile.jpg.
In theory we can just hand out that URL to anyone we want to share the file with; however, this is not the case with the BLOB we just uploaded. If we paste that URL into a browser you’ll see that you get a HTTP 404 response: File Not Found.
What?! We see that the file exists by using Azure Explorer, so why doesn’t the URL work? By default when containers are created they are created as private containers unless specified otherwise. This means that only those people who have the account credentials, or a specially-generated URL created using those credentials, may access the file.
If we right-click on the storage account node, then we can select ‘New Blob Container’, which will show us a dialog we can use to create a new container, including the ability to select the access level for the content of the container. We can select from Private, Blob access or Container access. If we set the property to ‘Container‘ then anonymous callers can iterate through, and view, all of the BLOBs within a container, though they can’t access the contents of other containers within a storage account. If the property is set to ‘Blob’, then the anonymous callers can only get BLOBs that they have a direct URL for, or can guess at.

Create a new container and then use Azure Explorer to copy the file that we uploaded from the private container over to the public container, or just add any file from the local computer by dragging it into the new public container. You can drag and drop the file from one container to the other, or use the context menus for Copy and Paste just like you would with Windows Explorer. If we select the ‘Copy Path’ option from the file in the new public container and attempt to reach the BLOB via the URL, we will now find that we get the file served to us.
If we wanted to use code to set a BLOB Container to have specific permissions, we would do so by using the
BlobContainerPermissions object. Here is an example of altering the code we have already used, except that we set the permission level on it directly after we create the container.
When setting the
PublicAccess property on the BlobContainerPermissions object initializer, we chose between ‘Container’ and ‘Blob’. This determines the level of access to the content of the container that anonymous requests will get. These options correspond to the ‘Blob’ and ‘Container’options that we had when we use Azure Explorer to create the container.
When we are hosting public files that will be individually accessed by anonymous clients who know what they are looking for it is a good idea to set the container to the ‘Blob’ access permissions. A very common example of this would be if we use BLOB storage to keep all of our JavaScript, CSS and image files for a website. The HTML returned from our server will have direct URL locations of the BLOBs so the clients do not need to iterate through the contents of a container. However, if a client may not know the exact URL of a file and may need to see all of the files within a container then set the access permissions to ‘Container’ access.
What is application/octect-stream?
If we take a look at the file that we have uploaded from code to the account using Azure Explorer, we’ll notice that one of the detail columns is “Content Type“. It likely says “application/octet-stream” for the file.
The content type is returned as a HTTP Header when clients request the file out of BLOB storage, just as it is when files are served from most web servers. The specific content type of application/octet indicates that the file is a binary file but the information isn’t exactly that useful beyond that. Modern browsers can decipher the actual type of file when it requests the file, which is why, when we requested this file via the browser, it pulled up the picture for us to see. Unfortunately, not all file types may get recognized and less intelligent clients might have a hard time deciding what to do with the file it is receiving. It would be better if we correctly set the content type so that the clients requesting the file know what they are getting. There are a couple of ways we can set this value.
If we are uploading BLOB using the client library we can set the
ContentType by setting the ContentType property. As we have seen the default is application/octet-stream. The code would look like this:
Now when we run our upload code, we’ll see that the content type is set correctly. If we needed to update the content type on files that already exist in the container without re-uploading the actual file, we can update their properties by getting a reference to the BLOB. With this reference, we can fetch the current values, set the property that we want to update and call
SetProperties on the BLOB.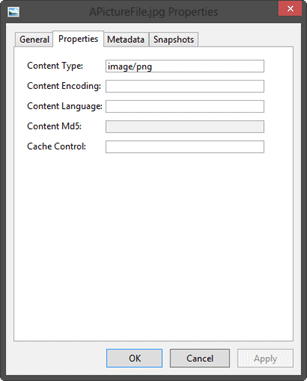
Be very careful to ensure you call
FetchAttributes: This will make a call to the REST API to retrieve all the metadata and properties for the BLOB, but not the content of the file. If you omit the call to FetchAttributes, then you could lose other property values because it will overwrite all of the properties when you call SetProperties.
If we only needed to modify the content type of just a few files, or any other property for a BLOB, we can use Azure Explorer to do so much more conveniently. Select the file you’d like to modify in Azure Explorer, right-click and select ‘Properties’ just like you would do from Windows Explorer. Alternatively, you can select a file and click on the ‘Properties’ icon in the ribbon menu. A dialog will appear that has several tabs, including a “Properties” tab.
From here you can easily set any of the property values and select ‘Apply’ to update the BLOB.
Getting Our Data Back
So far we have uploaded files and pulled them back using a Browser or Azure Explorer, but what if we need to pull the code back down using the client library? This is accomplished in much the same way as when we uploaded it. We will get a reference to the blob and then use that reference to write to a filestream.
Behind the scenes, the client library is making a call to the REST API to retrieve the content of the file. This may result in one or more calls to the REST API just as it did when we uploaded it, depending on the size of the file. The great thing about the client library is that it abstracts away all this complexity for you.
When you are developing, or just managing a private container for your own personal files, you will find that a storage tool like Azure Explorer will be much more convenient to quickly pull down files. Using Azure Explorer you can quickly drag and drop any of the files you see to your desktop or another location and the tool will download the file to that location. You can also use the Download icon on the ribbon menu as well.
Giving BLOBs Meaning
One of the really neat features of BLOB storage is that we can add metadata to a BLOB. This lets us provide some additional information to a BLOB to give it context. For example, we might add a
DocumentSource value to a BLOB so as to indicate where a BLOB came from, or perhaps give a Word document a metadata value for the author of the document. These metadata values can then be looked at either in code or from tools like Azure Explorer. Metadata for a BLOB are Key-Value pairs of data. The keys must adhere to the C# Identifier naming conventions and are case in-sensitive, but they do retain the casing they were created with. The whole metadata item (key and value together) cannot exceed 8K in size.
We can add metadata to BLOBs when they are created or later on, as part of an update. The following code would set a Source metadata value before we uploaded our image in the previous example:
If we wanted to edit the MetaData that was already on an existing BLOB, the code would look very similar to the code that updated the Content Type.
Notice that we once again need to call
FetchAttributes so that all the current BLOB properties and metadata is pulled down. We then alter what we want and call SetMetadata to push the change back up to the BLOB.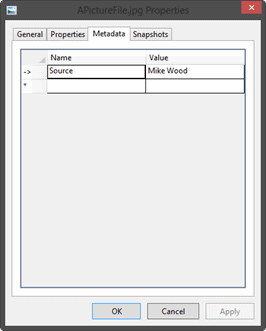
We can add metadata to BLOBs and even BLOB containers. This is a great way to help provide meaning to our containers and files, thereby allowing us to provide context to them that the calling code can use. Also just like with
ContentType, we can access and modify the metadata for a BLOB or container from Azure Explorer by using the Metadata tab on the Properties dialog.
Do not get metadata values in BLOB storage confused with embedded file properties as they are not the same. For example, if we use Windows Explorer to look at the properties for a MP3 file or JPG file you might see details that include the Album name for the song or the shutter speed used to take the picture. These are embedded details of the file itself. The metadata we add to the BLOBs are separate and only have meaning within BLOB storage.
What is this Snapshot tab for?
When we were looking at the properties and metadata, you may have noticed that there was a tab within Azure Explorer that was for snapshots. We have the capability in BLOB storage of taking a snapshot of a BLOB, which preserves the content of a BLOB at a particular time. We could, for example, use this to keep a historical record of changes to a file over time, with the ability to retrieve an older version of that file.
We can create a snapshot of a BLOB fairly easily from code. Modifying the example we had before for uploading a file, we can modify the code to take a snapshot of the file that we already added. Then I’ll upload another image to the same BLOB name which will effectively overwrite the image.
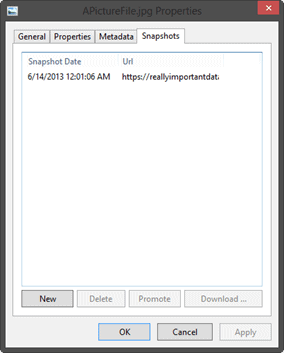
Now if we attempt to reach the regular BLOB URL, or try to open the BLOB directly from Azure Explorer, we’ll see that the image was indeed overwritten with the newer image. We can use Azure Explorer to look at the properties for the
APictureFile.jpg file to see that the snapshot tab has some information in it. For each snapshot on the BLOB we will see the date and time that the snapshot was created and the URL that could be used to directly access the snapshot.
As you can see, Azure Explorer can easily manage snapshots as well. You can download specific snapshots of a BLOB, create new ones or even promote an older snapshot to overwrite the current version. In this case the promotion will revert the file back to our original image.
While we are charged by how much data we store in the BLOB account it doesn’t necessarily mean that we are charged per snapshot. In the example above, I replaced the original content with a completely different file; however, BLOB storage is smart enough to keep only a delta whenever possible. For example, if the file was a 4 MB text file and we took a snapshot, when we append another 2 MB to the end of the file we will only be charged for storing 6 MB of data, not 10 MB. That’s 4 MB for the original and the snapshot, then another 2 MB for the delta. Just remember that the amount of storage is calculated using the current size of a BLOB plus all of the deltas of any snapshots. For instance, a 2 MB current BLOB has a snapshot that was 10 MB in size you may be getting charged at least 10 MB and up to 12 MB depending on just how different the files were.
What about Nested Folders?
When developers work with files they often also deal with nested folder structures. Since Windows Azure BLOB storage has a much more flat structure it is important to point out the differences from what you may be used to on a file system. It may be common on a traditional file system to have a folder structure such as \content\images\icons. These are distinct folders that are nested under each other and may contain files in addition to other folders. In Windows Azure BLOB storage a container can only contain BLOBs. It cannot contain other containers; however, with a little sleight of hand we can provide the illusion of nested containers.
Go back and change the code we worked with above and modify the GetBlockBlobReference method call line to the following:
Notice that we added what appears to be a folder name and slashed delimiter to the name. Now when we run the code again you can refresh Azure Explorer to see that it appears we actually do have a nested folder structure.
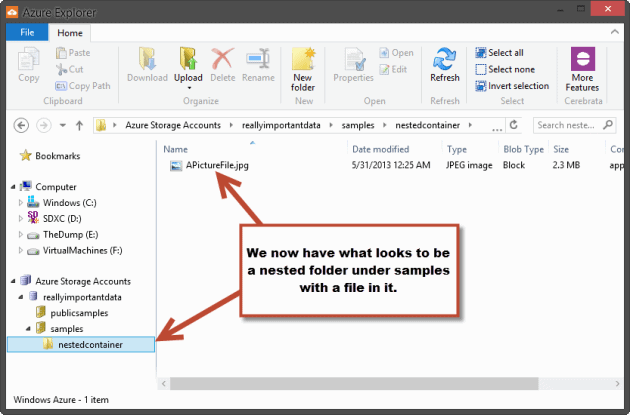
In reality, we have a container named samples that contains two BLOBs. One Blob is named
APictureFile.jpg and the other is named nestedcontainer/APictureFile.jpg. The forward-slash character is within the BLOB name itself, and the nested folder structure is an illusion.
Using Azure Explorer, we can click on the New Folder icon in the ribbon when looking at a container and add a new folder: However, unless you put something into that folder you actually haven’t created anything in the container. Again, this is because nested folders really do not exist in BLOB storage.
When working with BLOB storage from code with the client library you can use the
CloudBlobDirectory class to simulate nested directories as well. If the following code was put into our console application it would get a reference to the nestedcontainer “directory” we created before and list all of the BLOBs in it.
You’ll notice that the
CloudBlobDirectory doesn’t have a create method and that is because we can’t actually create a directory. We can only create BLOBs that have the appearance of being within a directory; however, using the CloudBlobDirectory object we can drill down into our virtual nested directory structures. Behind the scenes what is really happening is that the client library is sending requests to the REST API that is filtering the BLOBs within a container to those that start the same and have a delimiter in them, in this case “nestedcontainer/”.More on Azure Explorer
With Azure Explorer, you can easily several storage accounts from an interface that is as familiar as Windows Explorer. Sure, you can do some of the same operations from the web based Windows Azure portal, such as adding new BLOBs or editing metadata, the ability to quickly move files between accounts or containers and working with snapshots just isn’t as easy as it is with Azure Explorer.
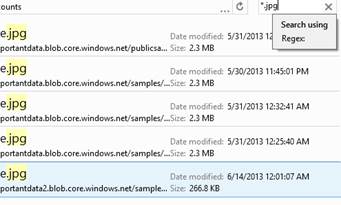
One really great feature of Azure Explorer is that you can use it to search your containers and accounts. You can even search across accounts and get a list of files with a specific file extension or those that match a regular expression. Just select the node in the tree where you want the search to start from, and type in your search term in the search box. Once your results come back, you can download all the files, move them all to another account and more.
Summary
There are many ways that BLOB storage can help your applications and processes, such as storing files off site, creating a file-sharing mechanism with partners or even share files with anyone.
The Windows Azure BLOB storage services provide many more features than the essentials that we’ve covered here. If you are looking for places to learn more, I’d like to suggest checking out the Windows Azure Training Kit as well as the documentation and ‘How To’ articles on WindowsAzure.com. Here are a few topics that I think you’ll want to understand as you dive into use BLOB storage:
- How to use an ETag on BLOBs to help deal with concurrent edits.
- How to use the Shared Access Signatures to create a unique URI for a BLOB that will give anyone with that link access to a BLOB based on some time based policy. This is a great feature for giving limited access to private BLOBs to people without giving them your account key.
- How to turn on and monitor storage account statistics so that you can see how your BLOBs are being accessed.
- How to leverage Retry policies when using the Client Library through the BlobRequestOptions parameter that can be passed to most of the BLOB operations. This is very important for dealing with transient errors that might occur in distributed systems.
- How to leverage the Windows Azure Content Delivery Network (CDN) to expose the BLOBs in your public containers to a world-wide set of data centers so that your content is closer to your end users, thereby making it quicker for them to access.
- Understanding how you are charged for using the BLOB storage service. Currently you are charged by how much data you store in your account as well as the number of transactions against your account. The amount of these charges have been going down as the cloud vendors make file storage a commodity, but it is still important to understand how you are charged no matter how small the amounts are.
As you work with learning more about the BLOB storage services I recommend continuing to use Azure Explorer. You’ll find a storage tool indispensable if you work with BLOB storage regularly. Cerebrata is always looking to improve their products so feel free to contact them with your ideas and any issues you may run into. Also, if you find that you need a few more features than are offered by Azure Explorer you ought to look at the Azure Management Studio product from Cerebrata which is a more wide-ranging management tool covering not only BLOB storage, but also table storage, storage queues, and even managing your deployed compute nodes in Windows Azure.
No comments:
Post a Comment